> ## Documentation Index
> Fetch the complete documentation index at: https://docs.briefer.cloud/llms.txt
> Use this file to discover all available pages before exploring further.
# Kubernetes
> A guide on how to deploy Briefer on a Kubernetes cluster.
This guide will teach you how to deploy Briefer on your Kubernetes cluster so that your whole team can access it and collaborate.
We'll use Briefer's Helm Chart in this guide. Still, you can feel free to take
that chart and customize it to your liking, including using tools like
[Kustomize](https://kustomize.io/).
## A Kubernetes deployment overview
Once complete, your Kubernetes deployment should include Briefer's `web` and `api` services, a Jupyter server, and a Postgres database to store data. It can also include the AI service in case you want to enable code generation features.
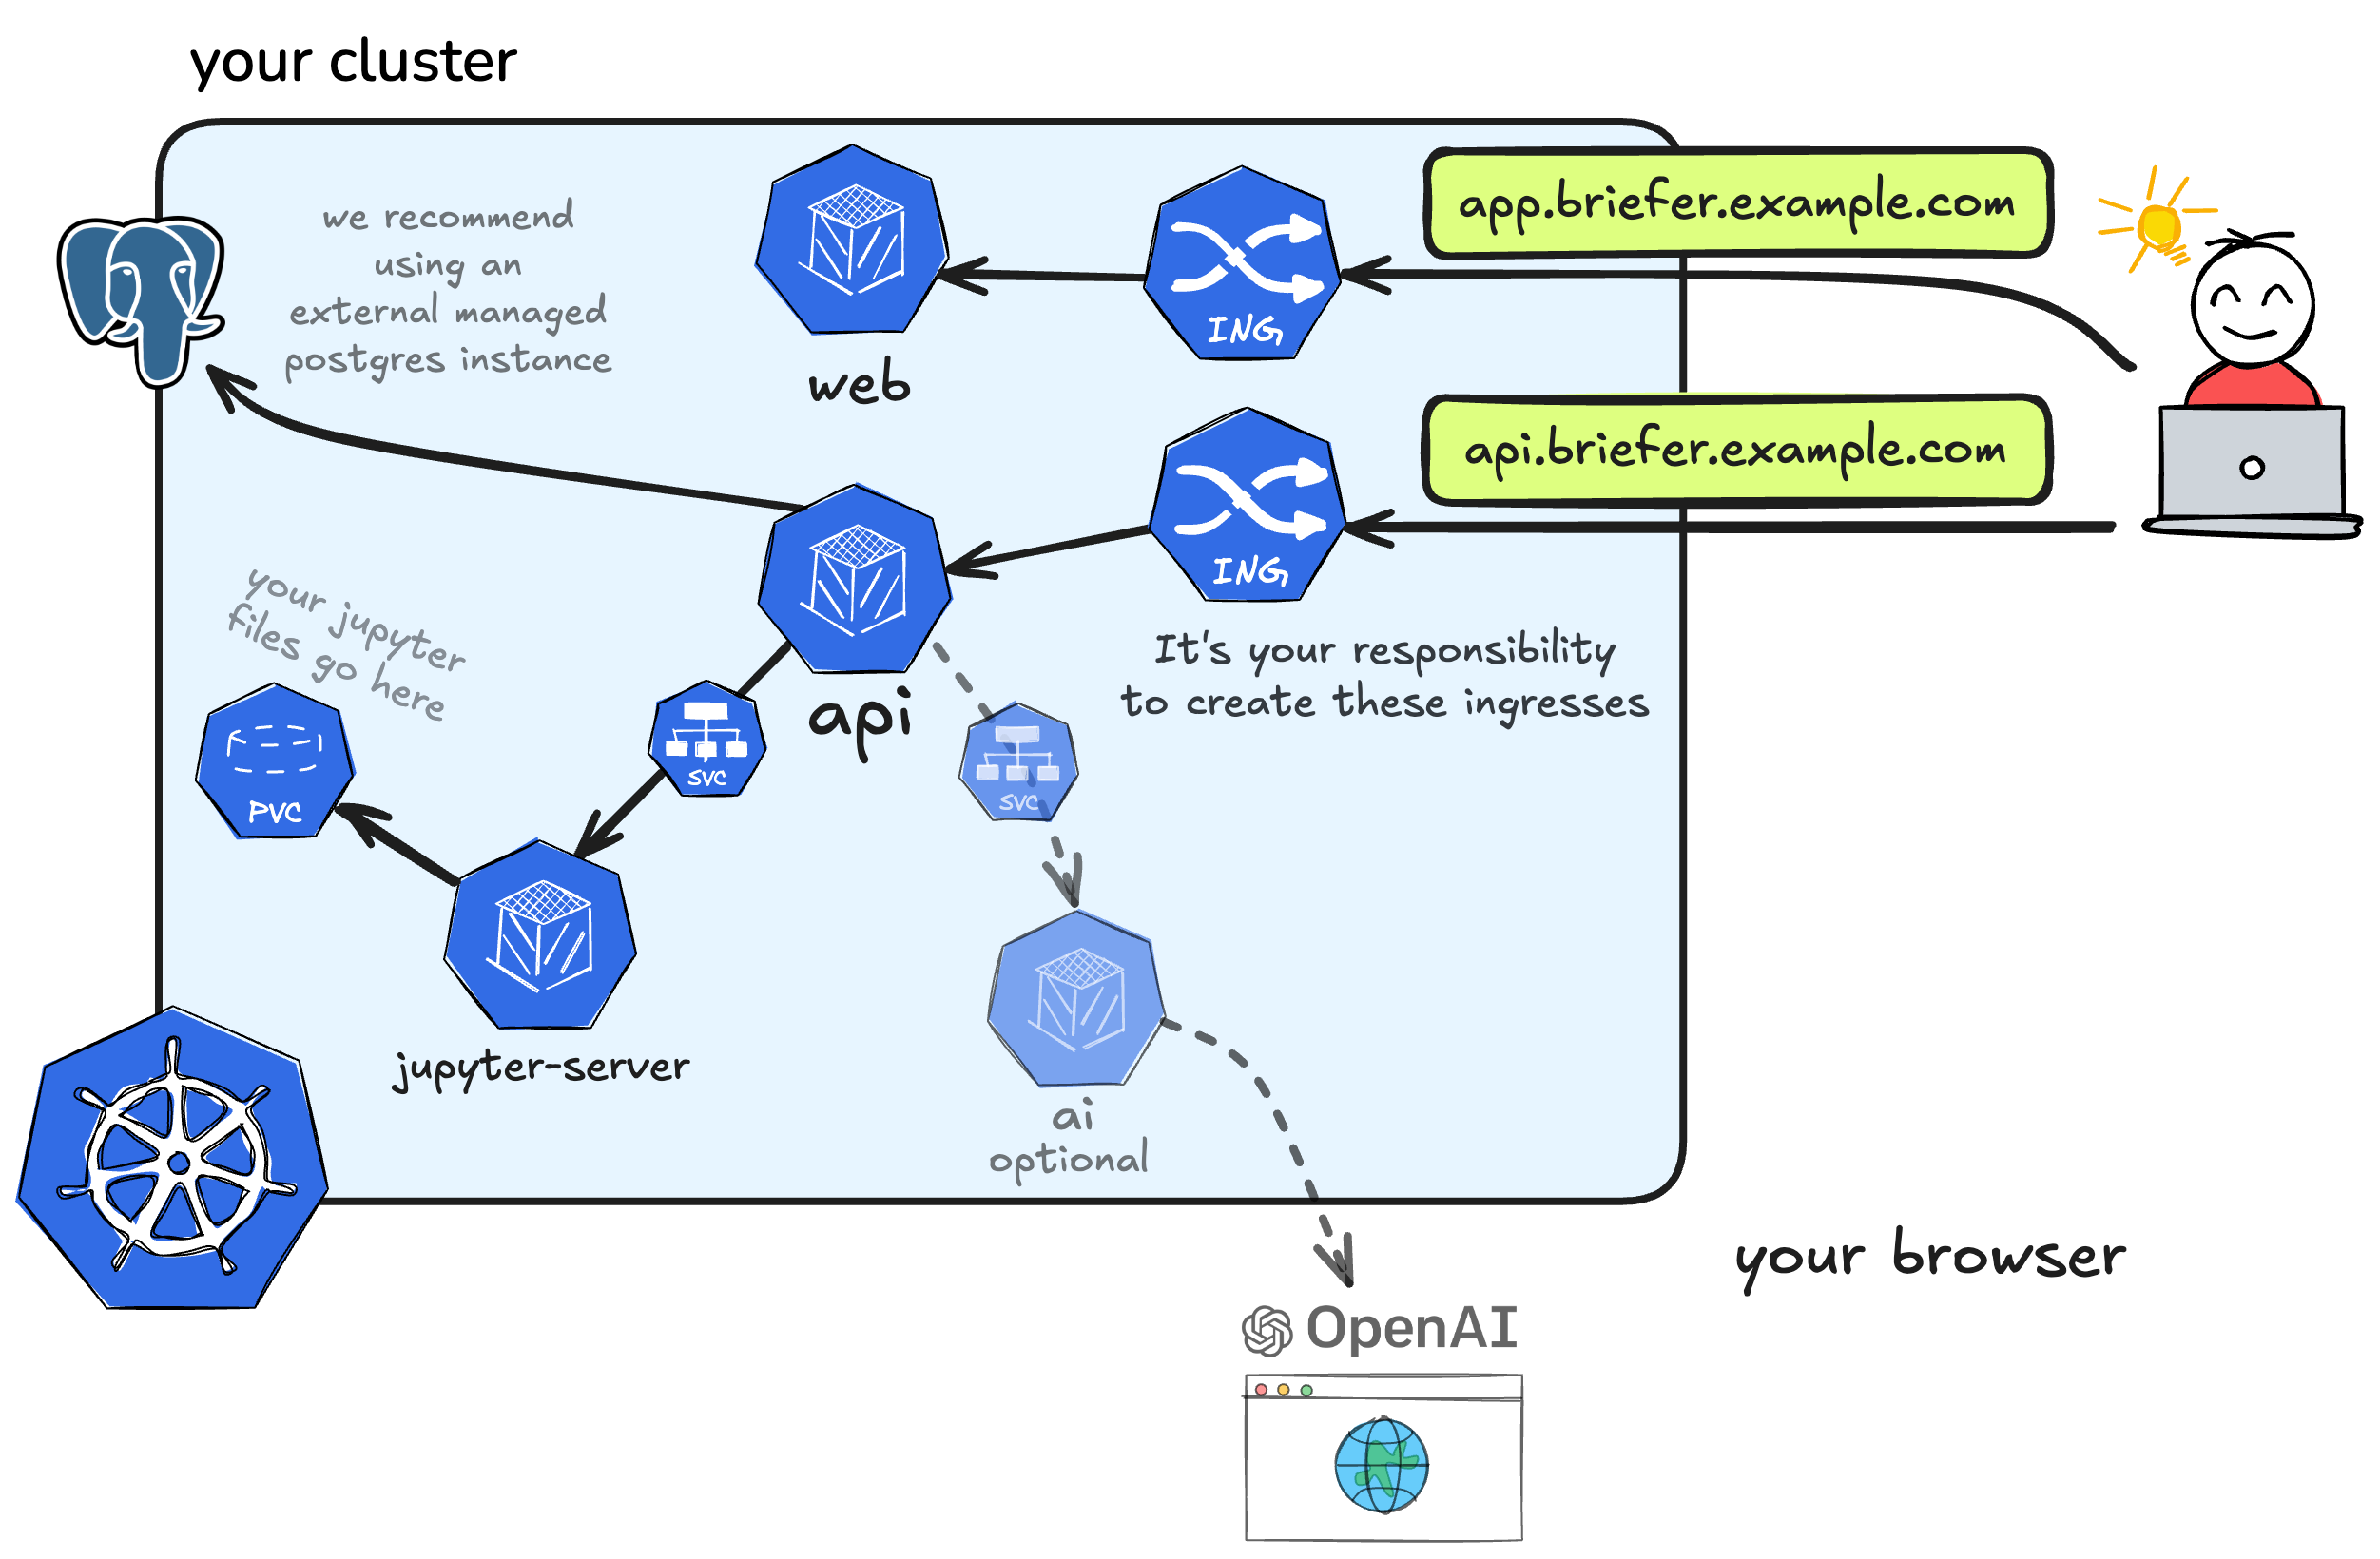
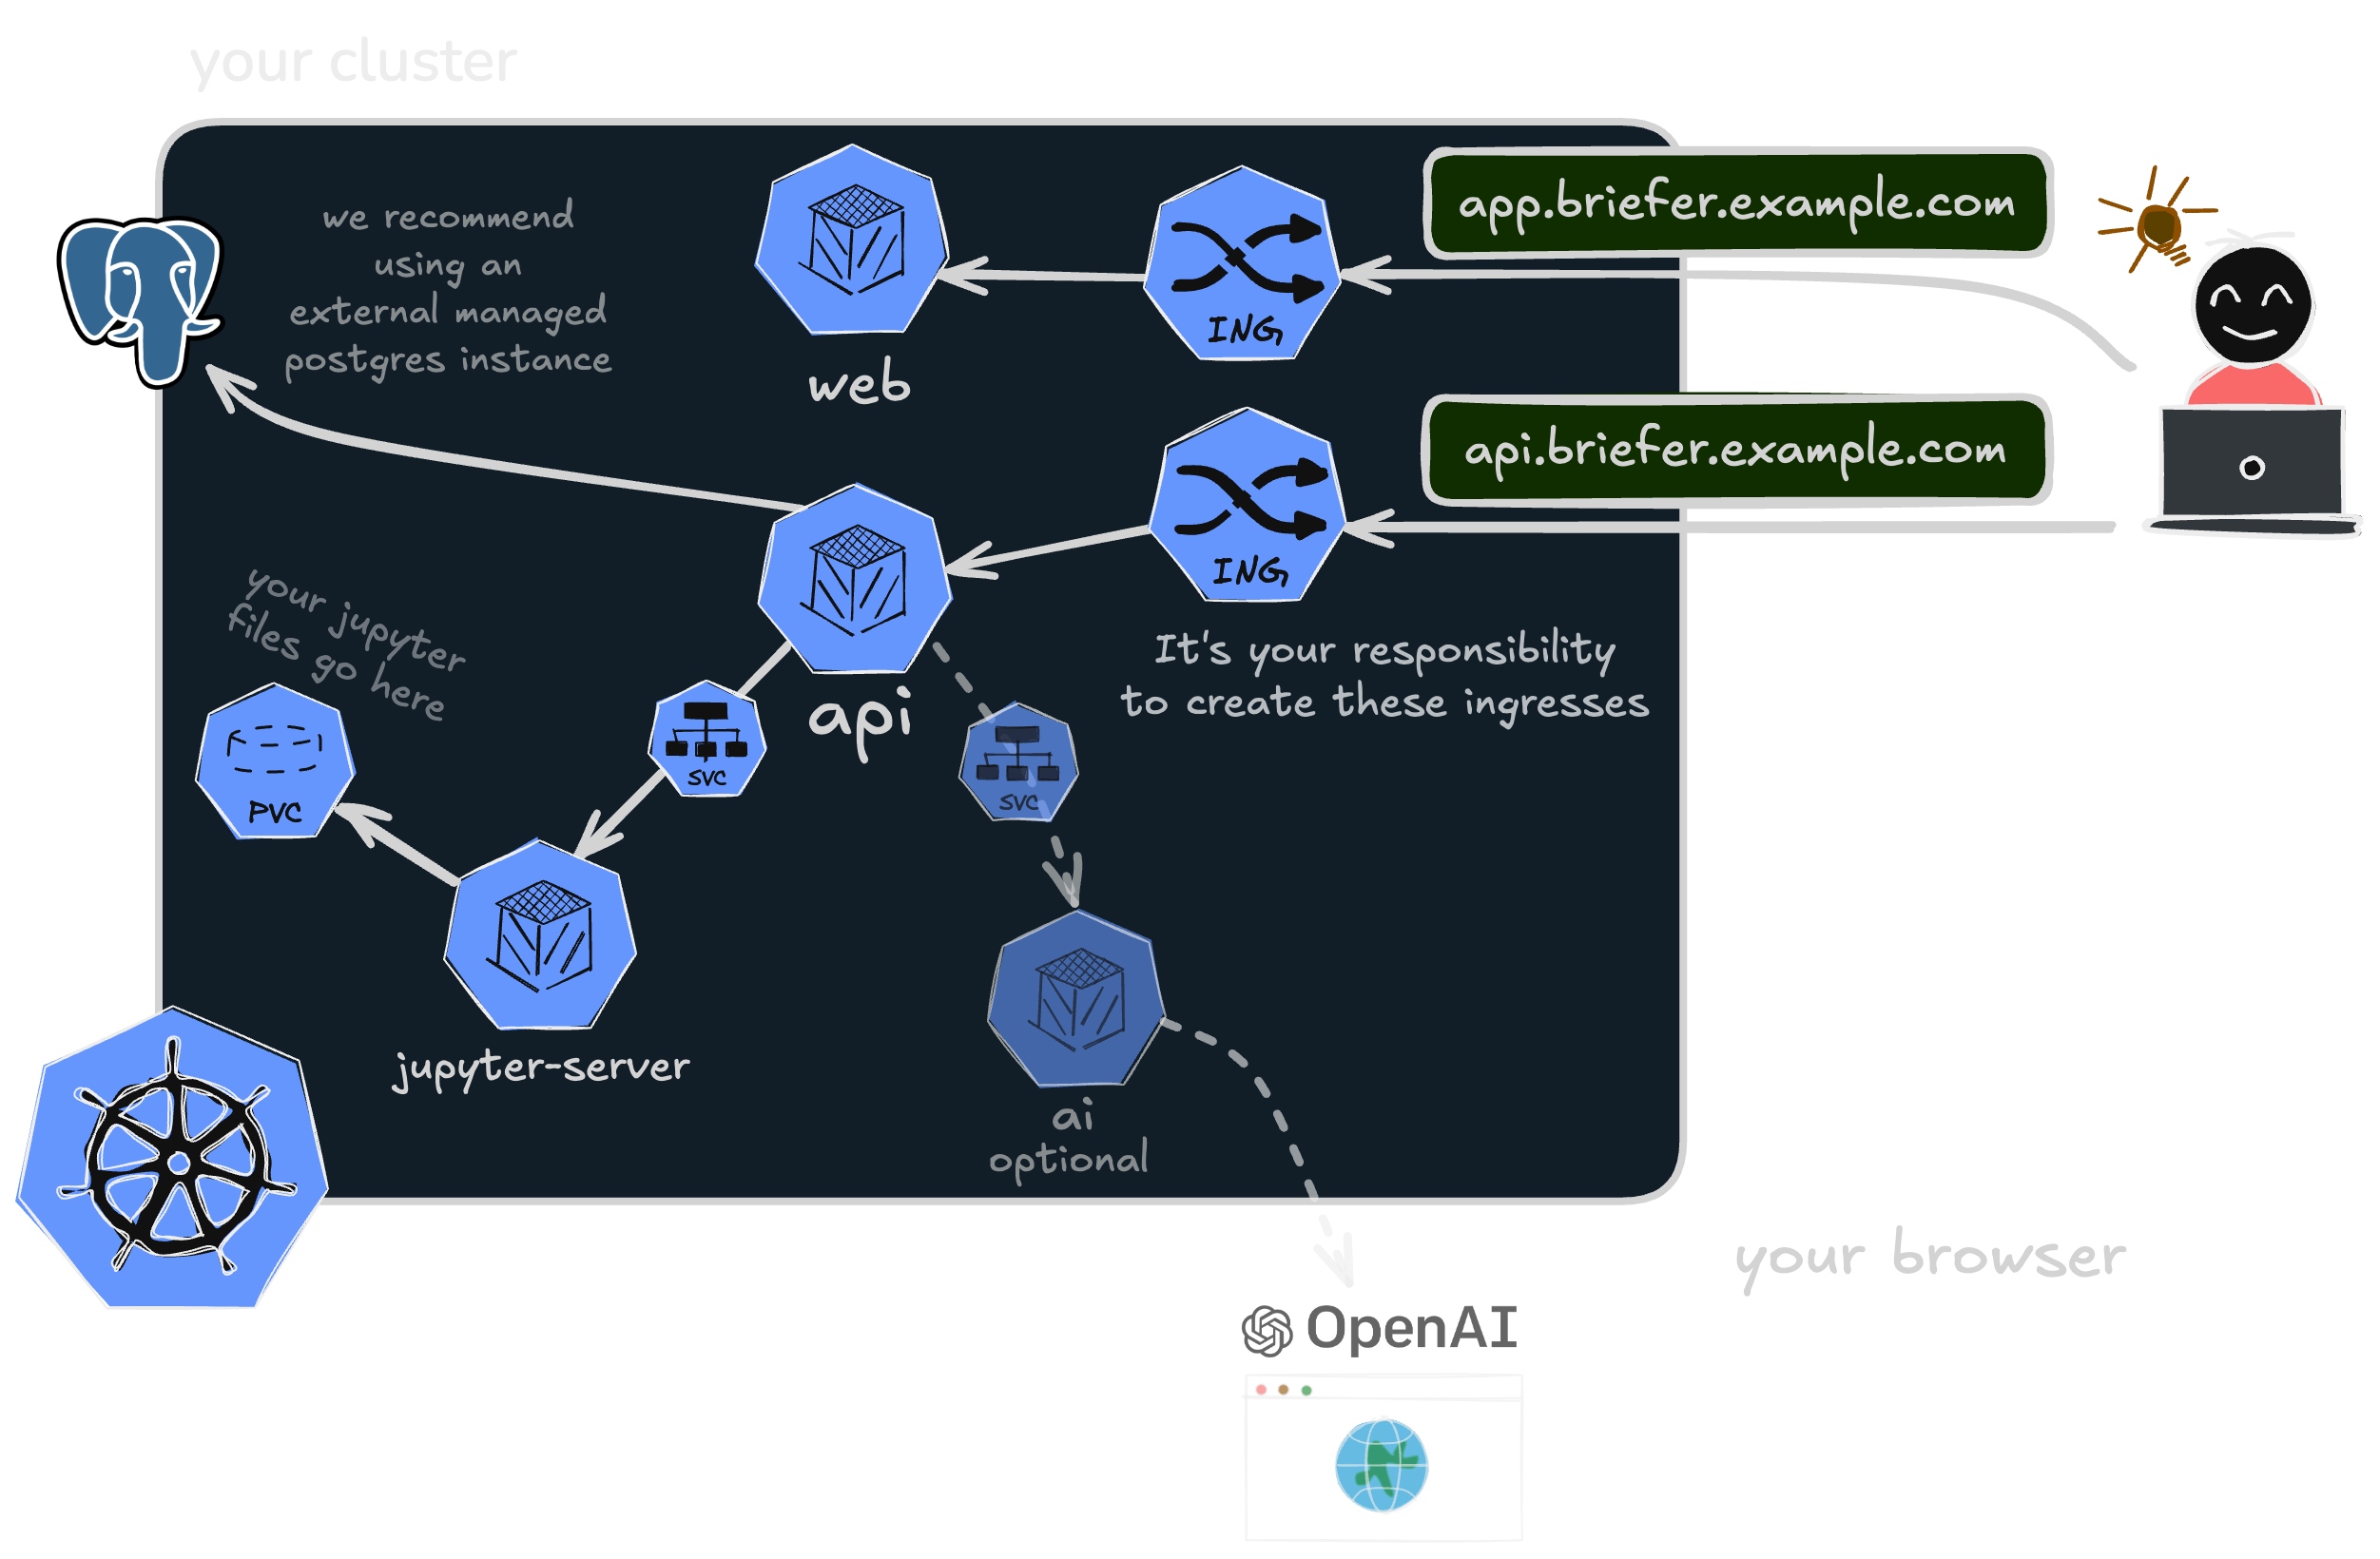 All of Briefer's components are included in its helm chart, except for the `Ingress` resources, which you should create yourself taking into account which ingress controller you're using.
We recommend that you use an external Postgres instance like Supabase or AWS
RDS.
## Deploying Briefer using its Helm chart
Using Briefer's Helm chart is the easiest way of setting up Briefer on your Kubernetes cluster.
1. Start by adding Briefer's chart repository to your Helm repository list.
```bash theme={null}
helm repo add briefercloud https://charts.briefer.cloud
```
2. Create a `values.yaml` file in which you'll configure the URLs you want Briefer to use.
```yaml theme={null}
api:
env:
# update these two URLs with your future ingress URLs
frontendUrl: https://app.briefer.yourcompany.com
apiUrl: http://api.briefer.yourcompany.com
```
3. Now, install the `briefer` chart from the newly added chart repository, passing your `values.yaml` file.
```bash theme={null}
helm install briefer briefercloud/briefer \
-f ./values.yaml \
--namespace briefer \
--create-namespace
```
Feel free to change the namespace if you want to. If you're using an existing namespace, please remove the `--create-namespace` flag.
4. After installing Briefer's Helm chart, you can confirm that the manifests have been applied by listing all the pods in the chart's target namespace (usually `kubectl get pods -n briefer`).
If you're running a Postgres instance within your cluster, it might be that
the API will be ready before the Postgres instance is up. In that case,
you'll see that the API pod will keep restarting for a few minutes. That's
*normal*. It happens because the API needs to connect to the database to
start, so it'll just keep trying to start until Postgres is ready.
5. Create the necessary `Ingress` resources so that you can access Briefer's API and Web containers.
Make sure to use the same URLs you've configured in step 2.
**Now, see the section below to learn how to configure your Briefer deployment on Kubernetes.**
## Configuring your Briefer deployment on Kubernetes
You can configure your Briefer deployment through a `values.yaml` file that you'll pass to Helm when installing Briefer's chart.
In this section we'll describe the most common configurations you might want to make.
To see a full `values.yaml` example, [check out our GitHub repo](https://github.com/briefercloud/briefer/blob/main/chart/values.yaml).
### Setting up Briefer's URLs (mandatory)
**When installing Briefer, you *must* tell it what are the URLs for the `web` and `api` services.**
You can do that by setting `api.env.frontendUrl` and `api.env.apiUrl` in your `values.yaml` file.
```yaml theme={null}
api:
env:
# update these two URLs with your future ingress URLs
frontendUrl: https://app.briefer.yourcompany.com
apiUrl: http://api.briefer.yourcompany.com
```
Make sure that these values match the address you're using in your `Ingress` resources.
### Using an external Postgres instance (RDS, Supabase, etc)
**We strongly recommend that you use an external Postgres instance to store Briefer's data**.
For that, you'll need to disable `enableLocalPostgres` and set `api.env.postgresHostname`, `api.env.postgresPort`, `api.env.postgresDatabase`, `api.secrets.postgresUsername`, and `api.secrets.postgresPassword`, as shown in the example below.
```yaml theme={null}
enableLocalPostgres: false
api:
env:
postgresHostname: localhost
postgresPort: 5432
postgresDatabase: briefer
secrets:
postgresUsername: postgres
postgresPassword: password
```
If you're using an external Postgres instance, make sure to that it includes [the `pgvector` extension](https://github.com/pgvector/pgvector). Briefer uses `pgvector` to store and query embeddings when you use the AI service to generate queries and code.
### Using more than one replica for Briefers' services
If you want to use more than one replica for Briefer's services, you must set the `replicas` for each service in your `values.yaml` file.
After doing that, make sure to enable sticky sessions in your `Ingress` resources. Without sticky sessions (also known as Session Affinity), Briefer will not work correctly when using multiple replicas.
If you're using the Nginx Ingress controller, for example, you can enable sticky sessions by adding the annotations below to your `Ingress` resources.
```yaml theme={null}
nginx.ingress.kubernetes.io/affinity: 'cookie'
nginx.ingress.kubernetes.io/session-cookie-name: 'http-cookie'
nginx.ingress.kubernetes.io/session-cookie-expires: '172800'
nginx.ingress.kubernetes.io/session-cookie-max-age: '172800'
```
It's not necessary to use sticky sessions if you're using only one replica.
### Configuring pod sizes
We recommend that you explicitly configure the size of your `jupyter` pod so that it has enough memory and vCPUs to run your analyses.
Additionally, you can also set `resources` and `limits` for your `api`, `web`, and `ai` pods.
Below, you can see an example of how to configure your pod's sizes.
```yaml theme={null}
# We recommend that you set these values
jupyter:
resources:
requests:
cpu: 1
memory: 4Gi
limits:
cpu: 1
memory: 4Gi
# These ones usually aren't as important
api:
resources:
requests:
cpu: 1
memory: 4Gi
limits:
cpu: 1
memory: 4Gi
web:
resources:
requests:
cpu: 1
memory: 2Gi
limits:
cpu: 1
memory: 2Gi
ai:
resources:
requests:
cpu: 0.5
memory: 2Gi
limits:
cpu: 0.5
memory: 2Gi
```
### Running Jupyter pod on a specific node
Sometimes, it might be that you want to run your Jupyter pod on a specific node because it has more memory or CPUs available. In that case, you can use the `affinity` and `tolerations` options within `jupyter` in your `values.yaml` file, as show below.
```yaml theme={null}
jupyter:
tolerations:
- key: 'briefer.cloud/domain'
operator: 'Equal'
value: 'core'
effect: 'NoSchedule'
affinity:
nodeAffinity:
requiredDuringSchedulingIgnoredDuringExecution:
nodeSelectorTerms:
- matchExpressions:
- key: briefer.cloud/domain
operator: In
values:
- jupyter
```
### Disabling the AI service
Sometimes, you might not want to run the AI service to avoid sending requests to OpenAI. If that's your case, you can disable the `ai` service by setting `ai.enabled`
```yaml theme={null}
ai:
enabled: false
```
If you disable the AI service, you will not be able to use the "Edit with AI" and "Fix with AI" features.
## Upgrading Briefer's versions
The best way to upgrade your Briefer deployment is to install a newer Helm chart. All of Briefer's Helm charts include image tags in their default `values.yaml`. Therefore, installing the latest published Helm chart should also cause your pods to use newer images.
Here's how to install Briefer's most recent Helm chart.
1. Pull the latest list of available charts from the `briefercloud` Helm repository.
```
helm repo update briefercloud
```
2. List all the available versions
```
helm search repo briefercloud --versions
```
3. Install the latest version or the desired version from the list.
```bash theme={null}
helm install briefer briefercloud/briefer \
-f ./values.yaml \
--namespace briefer \
--create-namespace \
--version
```
Alternatively, if you don't want to install a newer Helm chart, you can just update the images tags' within `values.yaml`, as shown below.
```
# We don't recommend upgrading images this way but it's possible
jupyter:
image:
repository: docker.io
name: briefercloud/briefer-jupyter
tag:
api:
image:
repository: docker.io
name: briefercloud/briefer-web
tag:
web:
image:
repository: docker.io
name: briefercloud/briefer-api
tag:
ai:
image:
repository: docker.io
name: briefercloud/briefer-ai
tag:
```
We don't usually recommend users to change the `image` tag through
`values.yaml`. That's because newer versions of Briefer might require
environment variables that are not passed to the pod's in older versions of
the chart. Still, this might be useful for quick changes sometimes.
All of Briefer's components are included in its helm chart, except for the `Ingress` resources, which you should create yourself taking into account which ingress controller you're using.
We recommend that you use an external Postgres instance like Supabase or AWS
RDS.
## Deploying Briefer using its Helm chart
Using Briefer's Helm chart is the easiest way of setting up Briefer on your Kubernetes cluster.
1. Start by adding Briefer's chart repository to your Helm repository list.
```bash theme={null}
helm repo add briefercloud https://charts.briefer.cloud
```
2. Create a `values.yaml` file in which you'll configure the URLs you want Briefer to use.
```yaml theme={null}
api:
env:
# update these two URLs with your future ingress URLs
frontendUrl: https://app.briefer.yourcompany.com
apiUrl: http://api.briefer.yourcompany.com
```
3. Now, install the `briefer` chart from the newly added chart repository, passing your `values.yaml` file.
```bash theme={null}
helm install briefer briefercloud/briefer \
-f ./values.yaml \
--namespace briefer \
--create-namespace
```
Feel free to change the namespace if you want to. If you're using an existing namespace, please remove the `--create-namespace` flag.
4. After installing Briefer's Helm chart, you can confirm that the manifests have been applied by listing all the pods in the chart's target namespace (usually `kubectl get pods -n briefer`).
If you're running a Postgres instance within your cluster, it might be that
the API will be ready before the Postgres instance is up. In that case,
you'll see that the API pod will keep restarting for a few minutes. That's
*normal*. It happens because the API needs to connect to the database to
start, so it'll just keep trying to start until Postgres is ready.
5. Create the necessary `Ingress` resources so that you can access Briefer's API and Web containers.
Make sure to use the same URLs you've configured in step 2.
**Now, see the section below to learn how to configure your Briefer deployment on Kubernetes.**
## Configuring your Briefer deployment on Kubernetes
You can configure your Briefer deployment through a `values.yaml` file that you'll pass to Helm when installing Briefer's chart.
In this section we'll describe the most common configurations you might want to make.
To see a full `values.yaml` example, [check out our GitHub repo](https://github.com/briefercloud/briefer/blob/main/chart/values.yaml).
### Setting up Briefer's URLs (mandatory)
**When installing Briefer, you *must* tell it what are the URLs for the `web` and `api` services.**
You can do that by setting `api.env.frontendUrl` and `api.env.apiUrl` in your `values.yaml` file.
```yaml theme={null}
api:
env:
# update these two URLs with your future ingress URLs
frontendUrl: https://app.briefer.yourcompany.com
apiUrl: http://api.briefer.yourcompany.com
```
Make sure that these values match the address you're using in your `Ingress` resources.
### Using an external Postgres instance (RDS, Supabase, etc)
**We strongly recommend that you use an external Postgres instance to store Briefer's data**.
For that, you'll need to disable `enableLocalPostgres` and set `api.env.postgresHostname`, `api.env.postgresPort`, `api.env.postgresDatabase`, `api.secrets.postgresUsername`, and `api.secrets.postgresPassword`, as shown in the example below.
```yaml theme={null}
enableLocalPostgres: false
api:
env:
postgresHostname: localhost
postgresPort: 5432
postgresDatabase: briefer
secrets:
postgresUsername: postgres
postgresPassword: password
```
If you're using an external Postgres instance, make sure to that it includes [the `pgvector` extension](https://github.com/pgvector/pgvector). Briefer uses `pgvector` to store and query embeddings when you use the AI service to generate queries and code.
### Using more than one replica for Briefers' services
If you want to use more than one replica for Briefer's services, you must set the `replicas` for each service in your `values.yaml` file.
After doing that, make sure to enable sticky sessions in your `Ingress` resources. Without sticky sessions (also known as Session Affinity), Briefer will not work correctly when using multiple replicas.
If you're using the Nginx Ingress controller, for example, you can enable sticky sessions by adding the annotations below to your `Ingress` resources.
```yaml theme={null}
nginx.ingress.kubernetes.io/affinity: 'cookie'
nginx.ingress.kubernetes.io/session-cookie-name: 'http-cookie'
nginx.ingress.kubernetes.io/session-cookie-expires: '172800'
nginx.ingress.kubernetes.io/session-cookie-max-age: '172800'
```
It's not necessary to use sticky sessions if you're using only one replica.
### Configuring pod sizes
We recommend that you explicitly configure the size of your `jupyter` pod so that it has enough memory and vCPUs to run your analyses.
Additionally, you can also set `resources` and `limits` for your `api`, `web`, and `ai` pods.
Below, you can see an example of how to configure your pod's sizes.
```yaml theme={null}
# We recommend that you set these values
jupyter:
resources:
requests:
cpu: 1
memory: 4Gi
limits:
cpu: 1
memory: 4Gi
# These ones usually aren't as important
api:
resources:
requests:
cpu: 1
memory: 4Gi
limits:
cpu: 1
memory: 4Gi
web:
resources:
requests:
cpu: 1
memory: 2Gi
limits:
cpu: 1
memory: 2Gi
ai:
resources:
requests:
cpu: 0.5
memory: 2Gi
limits:
cpu: 0.5
memory: 2Gi
```
### Running Jupyter pod on a specific node
Sometimes, it might be that you want to run your Jupyter pod on a specific node because it has more memory or CPUs available. In that case, you can use the `affinity` and `tolerations` options within `jupyter` in your `values.yaml` file, as show below.
```yaml theme={null}
jupyter:
tolerations:
- key: 'briefer.cloud/domain'
operator: 'Equal'
value: 'core'
effect: 'NoSchedule'
affinity:
nodeAffinity:
requiredDuringSchedulingIgnoredDuringExecution:
nodeSelectorTerms:
- matchExpressions:
- key: briefer.cloud/domain
operator: In
values:
- jupyter
```
### Disabling the AI service
Sometimes, you might not want to run the AI service to avoid sending requests to OpenAI. If that's your case, you can disable the `ai` service by setting `ai.enabled`
```yaml theme={null}
ai:
enabled: false
```
If you disable the AI service, you will not be able to use the "Edit with AI" and "Fix with AI" features.
## Upgrading Briefer's versions
The best way to upgrade your Briefer deployment is to install a newer Helm chart. All of Briefer's Helm charts include image tags in their default `values.yaml`. Therefore, installing the latest published Helm chart should also cause your pods to use newer images.
Here's how to install Briefer's most recent Helm chart.
1. Pull the latest list of available charts from the `briefercloud` Helm repository.
```
helm repo update briefercloud
```
2. List all the available versions
```
helm search repo briefercloud --versions
```
3. Install the latest version or the desired version from the list.
```bash theme={null}
helm install briefer briefercloud/briefer \
-f ./values.yaml \
--namespace briefer \
--create-namespace \
--version
```
Alternatively, if you don't want to install a newer Helm chart, you can just update the images tags' within `values.yaml`, as shown below.
```
# We don't recommend upgrading images this way but it's possible
jupyter:
image:
repository: docker.io
name: briefercloud/briefer-jupyter
tag:
api:
image:
repository: docker.io
name: briefercloud/briefer-web
tag:
web:
image:
repository: docker.io
name: briefercloud/briefer-api
tag:
ai:
image:
repository: docker.io
name: briefercloud/briefer-ai
tag:
```
We don't usually recommend users to change the `image` tag through
`values.yaml`. That's because newer versions of Briefer might require
environment variables that are not passed to the pod's in older versions of
the chart. Still, this might be useful for quick changes sometimes.